"Oh no, not another one"
Yes, afraid so.
Back at the start of March the Micro Railway Cartel released the rules for their annual layout challenge - this time to build a 'tuning fork' layout. As usual for me, I'd used the rules as an exercise to make a few rough layout idea sketches and left it at that.
Then an unexpected flash of inspiration occurred thanks to a very tongue in cheek suggestion for a layout. I'm trying to keep the theme for this one under wraps till entrants are announced later in the year, so apologies if this layout seems to come and go from time to time!
As an added bonus, I've realised there are a few new things I want to try out for possible use on 'Church Lane', so this provides a nice test ground.
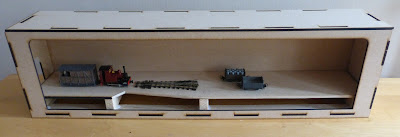
To that end, a shelf layout baseboard kit was purchased from Narrow Minded Railworks, ready for a fun project over the Easter weekend:

I've been keen to have a try at one of these since they first released, spurred on a bit by the work of James Hilton showing how a great sense of space can be achieved with the narrow Ikea Mosslanda dimensions in small scales. The kit as seen above comprises of a layout box, fiddlestick, LED lighting strip and the Ikea shelf itself. A larger 75cm length option to fit the Ikea 'Maleras' shelf is also available.
It's interesting that the openings are sized to OO/HO scale standard gauge stock, though besides using the layout as either a run through or single line terminus I can't really see any other options for that size given the 9cm internal depth of the box.

As with a lot of my modelling as of late, I've put a slight twist on the construction. Rather than having the track bed sitting on the box bottom I decided to raise it slightly to allow for some below track scenics. This didn't require much work, the kit includes a flat board with the idea being that you build a layout separate and then finally build the framing round it. A small notch was taken out of this for an eventual scenic feature and then a large slot cut out of the box bottom to allow access for wiring.
Assembled up, this was the result. The trackbed simply sits on some spare scraps of wooden battening and the hole to the fiddle yard in the end of the box has only been partially cut out to match. At this point the lighting lid and the front facia frame haven't been fixed in place to allow for track laying and scenic work.

I'm already having a lot of fun taking photos from a 'just below track level' angle. It helps create a sense of scale that I can't quite get with something like The Garden Railway.

On to day 2 of the baseboard build and the lighting pelmet was tackled. I did have a bit of a panic though when to my eyes the warm white LEDs looked more yellow! A few coats of 'Summer Tide' from a Wilkos tester pot were applied to the backscene and the inside of the pelmet had already been given a very liberal coating of white from a rattle can. The change was immediate and a far more natural tone that I was hoping for.
Another problem though has arose due to the tuning fork plan, with (as seen above) the foreground edge of any items of rolling stock being almost in silhouette. The only thing for it was the bodge the fascia and pelmet to bring the lighting source further forward.

And this was the result, very much inspired by a handy build guide by James Hilton over at his blog. It also proved a good use for some of those spare off cuts I've kept aside just in case!
Even at this very early stage, I'm impressed, and more importantly having a lot of fun thinking of other opportunities for one of these kits...
No comments:
Post a Comment