Just over a week back Holmeswell graced the pages of the spring issue of The Micro Model Railway Dispatch, effectively providing a nice bookend for my entry into last year's Christmas Challenge. You can find the article, and others, HERE.
Truthfully, I don't think this is my best writing, but I think that can be attributed to forcing a deadline upon myself and being full of cold and flu whilst writing. However Ian has done a fantastic job putting this together, and I'm still impressed with how good this layout looks in photographs. I can't help noticing that much like 'The Garden Railway', Holmeswell seems to have taken up residence as the final article in the issue. Is this becoming my unintentional home in the Dispatch? (I jest, Ian!)
And if the above slice of The Dispatch has wetted your appetite, all the back issues are also available to read for free HERE.
Voting closed for the Micro Model Railway Christmas Challenge on the 15th, and after all the votes were tallied Holmeswell came in at a very respectable 2nd place. Many thanks to any readers who did cast a vote for it, it's very much appreciated, and certainly a much higher finishing place than I expected for what was essentially the 'joker' entry.
It's also technically had its first exhibition outing! Last Saturday the Micro Layouts Facebook group held their annual virtual exhibition, with Holmeswell making its appearance around noon. Again, it was very well received, with even a request for more footage and photos at a later date.
And now comes the customary break for the festive period, usually I'd talk about a few options for modelling projects I have over this time, but this year all my projects seem to be making coaches (Both standard and narrow gauge) More on that another time.
I've also recently found myself with the opportunity for making a very silly layout idea a reality in 2026...
It's not a matter of if, it's a matter of when... 😉
Have a good Christmas everyone. See you all in the new year.
And here it is, after ten months of work from initial brainwave to finished layout: Introducing "Holmeswell"
The basic stats: 009 narrow gauge, tuning fork plan, fits on an Ikea Mosslanda shelf, 55x10cm.
Very much Wisbech & Upwell tramway inspired. Holmeswell came about purely by chance. As with almost every year the Micro Railway Cartel has run one of these Christmas challenges, I use the contest rules as a planning exercise, make a few rough layout sketches and generally leave it at that. This year was no exception.
Then April 1st came around.
It's unfortunate for contest host Ian Holmes that just prior to releasing the above April Fools video I'd finished scratchbuilding a 009 'Toby'. I certainly couldn't manage P4 standards, but the temptation to secretly make a Toby themed Mosslanda response was too good to pass up!
What materialised was a narrow gauge caricature of the Wisbech & Upwell Tramway, taking a good dollop of inspiration from Outwell Depot in particular.
Apologies to the late John T. Kenney for liberating and modifying the last illustration of 'Double Header' for the pub sign!
The Obligatory encounter.
'No.7' has actually been given a new source of power since its last appearance. Part of the contest rules stated that a short video of the layout running had to be provided (To prove it's more than a static diorama) Every time I tried to film No.7 would splutter and stall in an agonising way. It's my own fault - In a bid to use up items in the stash I'd built it on an old Kato-103 chassis, now superseded by the 109 variant. Mercifully, being made primarily from 40thou plasticard, cutting away the opening in the floor and interior to take the slightly larger 109 was easier than expected, with no harm to the body.
Being a terminus layout with no run rounds facilities requires the use of two locomotives. The Sentinel seems quite at home in the role of the yard engine.
The village policeman stops traffic at the road. In reality, this job would have been done by the depot manager. Of course, this is very much the stereotypical, rose tinted, chocolate box, peaceful day in the English countryside, so the policeman has taken over as a means of livening up his beat.
A quiet moment as a short freight train leaves the yard.
And another heavily laden train arrives with goods for onwards road transport.
And finally, actual footage of the layout working! This little clip of a freight train leaving the yard wasn't intended as a contest entry clip, but the shot was too nice not to share:
And with all that excitement I'm going to leave the blog here for the year, I'm certainly ready for the customary Christmas break in posting.
It sounds far more dramatic than it probably is...
Adopting the fortnightly posting approach has been a blessing and a curse. On the one hand, I can get a good few weeks worth of updates finished up in one sitting, on the other hand progress can sometimes happen in leaps and bounds quicker than posts can keep track of them!
So here we are, with one week to go till the contest deadline, a quick rapid fire of a select few construction milestones for the challenge layout. It's scary just how quickly the deadline has come around!
There was a very brief glimpse of an Airfix Matador kit a few weeks back, assembled and then cut at a jaunty angle. It works better than anticipated as a nice view block on the 'road to nowhere', making the scene feel deeper than it really is at this track level view (Remember, this is an Ikea Mosslanda layout, it's only 9cm deep!)
The yard gates are lightly bashed ScaleModelScenery platform fences, whilst the Pre-Worboys road signs help to set the scene firmly in the 1950s. I'm not quite sure why the postbox keeps glowing a luminous red in every photograph I take of it. It is painted a dull matt red, honest!
The layout has also come to life with the addition of figures, all coming from the Monty's Models range. I was asked why I was using white metal figures when high detailed 3D printed options, like those from Modelu, are now available. The answer? This is the one manufacturer I know who produces the stereotypical vicar in a panama hat! That said, the sharpness of the moulding on the station staff figure is incredible.
The conductor figure is part of a set with a bus driver, and due to the coach being one of the old Egger Bahn HOe stable, both his shoes and hat needed A LOT of filing down to fit. He's ended up wearing more of a flat cap than a peaked cap. A bit of a happy accident really, as this pose was very much inspired by a photo in K.E.Hartley & Paul Ingham book on the Sand Hutton Light Railway. It's quite a good match.
And finally, one of those jobs I'd been putting off for far too long - finishing some wagons for the layout. From right to left we have: A Corris brake (running as a boxvan), a tarpaulin covered wagon (A 'how to' is probably on the cards for next year), a coal wagon, a wagon full of timber and finally, the classic wagon load of milk churns and sacks from the Wills range.
For something different I tried weathering these using the range of washes from the Citadel Miniatures range. The results are... mixed. It goes on well enough, but it seems to 'pool' on any model I've applied it too., like it's a thicker mixture than the normal watered down acrylics. I've tried shaking and stirring the pot before application but the result is always the same. A little disappointing.
And that's a wrap (For now!) Next time the layout graces this blog will be the 'grand reveal' of a terrible punchline...
Scenically, progress is coming along in leaps and bounds now with the Cartel Challenge layout, a lot of this stemming from having gotten the first stages of ballasting down.
Posting the above quick photo update over on the Facebook group resulted in a couple of queries as to how I had created low relief trees for the backscene, so as a handy source to redirect people to in the future, what follows is a 'how to' as to the method I use.
You will need:
A few dried out old twigs
Black (Or dark green) thin card
Woodland Scenics dark and light course foliage
A razor saw
A hot glue gun (or PVA alternative)
Start out with the twigs, most importantly making sure that they have been left for a few days (Preferably a week) to dry out. How big these twigs need to be is very much dependent on what scale you're modelling in, in this case each on being roughly between a quarter and a third of an inch diameter to give a nicely sized trunk for a OO scale tree. The above cutting mat is A4 sized if that helps with getting a sense of scale. An effort was also made to obtain twigs with varying amounts of knots in them to add some variety.
Next, take one of the 'trunks' and cut it to the desired length for your tree, in my case I only show the main trunk as far as the lower branches so anywhere from 1-1.5inch is enough. Do make sure to make the length slightly longer than needed to help with the next step. Then use the razor saw to cut the trunk in half lengthwise. Hey presto! Two trunks!
Moving onto the foliage (Excuse the mucky fingernail!) Start by making a rough guide out of thin card to the shape of the topography you want. Have a look at photographs of trees to get some suggestions, but if you're still struggling to get something that looks 'right' a not quite figure eight shape like the one above is a pretty safe bet. Cutting the trunk slightly longer than needed helps with attaching it to the card base, this will end up being covered.
Handy tip: Make the card shape slightly smaller overall than the intended finished size, this will very quickly be bulked out.
And finally, some greenery! Nothing too special here as it's simply Woodland Scenics light and dark coarse foliage scraps stuck down with a hot glue gun. Something PVA based would probably be preferable to many I suppose, but speed was certainly of the essence here! As a rough guide, from the bottom up to the top quarter of the base was given a layer of the darker green, lighter green being added on smaller clumps on top till it looked right. This is definitely a good time to go looking at old episodes of Bob Ross's "The Joy of Painting" when it comes to use of light and dark.
And hopefully, if you've been following along, you should have a tree like the one above that looks quite passable for a tree in the height of summer! Of course this is only really a basic attempt, scatter products could easily be used to model a tree in the seasonal change from summer to autumn. Certainly something that could be fun to play around with.
And as a child of the 90s I can only sign off this post in the manner of Neil Buchanan's 'Art Attack'.
"Try it yourself! Low relief model railway trees, and I'll see you next time! Ta-ra!"
Another job that needed doing with the Cartel layout before the ever so wanted ballasting was creating a couple more low relief structures for the 'platform' side of the fork. One of these being a simple weighbridge/yard office.
I'd started scratchbuilding with Wills brick sheet but I just couldn't get the look I was after, even at this early stage it felt 'off' somehow. I was also getting a little frustrated with the material itself, compared to normal, the plastic itself felt tougher to cut through, yet was snapping in a brittle way with not too much pressure from the knife. All three walls of the box above needed remaking a couple of times due to this.
For the sake of balance though, I genuinely can't remember when I picked up this particular batch of the brick sheet, it could be a case of it having been stored improperly at some point. Certainly it's the first time I've ever encountered this with the Wills stuff.
And so, it was a case of 'kitbash to the rescue' in the form of the Wills Weighbridge Hut kit. Very much taking the Chris Ford approach here to detailing to hide the origins a bit: extra bars on the window, a suggested floor on the inside of the door, a door handle from a track pin head, and finally modifying the door into a slightly open position to imply some sort of life.
The rear wall piece of the original kit was fashioned into two new end walls, wanting a different roof profile to that of the supplied gable ends from the kit.
And for comparison, the new bash with the abandoned scratchbuild, already looking much better dimensionally!
The roof proved a little tricky, wanting all the sides to meet up at a central apex, but cutting the angles on the longest side first and then using this as a guide for the two smaller pieces made the task much easier. Strips of ordinary printer paper soaked in solvent help disguise any dodgy roof joins nicely.
From there it was a case of raiding the Wills building details pack for extra brickwork, gutters and bargeboards to help alter the rather flat faces of the structure. I've got to that stage where I now find it far easier to make downpipes out of 1mm plastic rod than bash pre-made ones. Granted, the above isn't the best example, but painting/weathering does a lot to hide the imperfections.
And once again, as a fun comparison, the heavily bashed low relief version next to the lightly bashed version of the same kit seen back in September of last year.
And finally, after painting and weathering and sitting in situ.
A very pleasing result, especially after the false starts. Sometimes, the simpler solution is the correct one.
My statistics page tells me that this is the 100th post to this blog! Hooray!
We're slowly getting there with the scenics for the Cartel Challenge layout, though at times it is a bit of puzzle. Logically, I need to work from the back to the front, but there are certain items I can't start on without finishing others first. Case in point, a retaining wall needed along the front of the layout.
I really want to try getting the ballast down amongst the track soon before the really cold weather arrives and slows down drying times drastically, but I can't until I had this 'edge' added to stop the glue and stones escaping.
This wasn't what I was originally planning for this wall though. A couple of months back Micro Model Railway Dispatch editor Ian Holmes talked about how they were using a Chooch Enterprises embossed sheeting to infill the rails on their challenge layout...
It got me interested as a means of speeding up the process of layout building, and a quick search showed that not only were their products available in the UK, but that they produced a wooden retaining wall in the style that I wanted for this scene.
A sheet was duly ordered, but upon arrival it seemed to me as if the planking was a little too small, certainly one of those cases were a product being labelled OO/HO can come back to bite you! So instead a pleasant afternoon was spent making my own.
Nothing particularly remarkable here: Two sheets of 40thou plasticard glued back to back, scribed at 4mm intervals to represent foot wide planks, scratched multiple times lengthways with the tip of a sharp knife to get a wood grain effect.
Installed on the layout, a few offcuts of 80x188thou strip were similarly scratched and added to create upright stanchions. Perhaps I've gone too far in the other direction and made the planking a little too wide. Certainly when it next appears there'll be a few more stanchions added, but of course it was far easier to add to few and more later than try to remove them at a later date.
And after all that work I quickly decided to check a photograph of the prototype this is based on.
The memory cheats.
The real thing had upright planking on the wall with horizontal bracing!
I've put too much work into this to want to change it, and in all honesty, this is very much a caricature, so it does work in this context. It's hardly a make or brake detail.
The first of the physical buildings for the challenge layout has reached a stage of 'almost' complete. The obligatory English pub:
You'll have to forgive the black censor bars. As mentioned before, there's a bit of a joke with the theme for this layout, and name for the pub is probably the biggest part of the punchline.
This is at its core a simple bash (Read as 'butting up against each other') of two Petite Properties kits, in this case No.12 Station Road & Crimple Cottage. I'd wanted to have a try at these kits since seeing Michael Campbell use them to great effect on his Loctern Quay layout. Both have been clad in 'garden wall' embossed plastic sheet from Expo Tools, and the roofs have been replaced with Wills slate sheet. Wanting something slightly older than the supplied shop frontage, a replacement was sourced from Scale Model Scenery, with only the minimal amount of bodging required to open out the window aperture on the body of the building.
An 'in progress' image perhaps gives a better idea of how this hodgepodge of parts went together:
It's as I'm writing this that it's suddenly dawned on me that there's only two and a half months to go till the deadline. To slightly misquote the tagline for Starlight Expresss: Better get my skates on!
It's been a while since we were at the Cartel Challenge layout.
I seem to have a started a thing over the last few years that every layout I work on either has to have a church or at the very least a churchyard on it. And so we come to the example for this layout:
Another first for this year, first time painting a church. Apologies to the lovers of Victorian remodelling and Gothic Revival, this is very much an artist's impression! In all honesty though, I'm quite pleased with the attempt at shading and arched windows. Certainly gives me the confidence to do further building painting onto a backscene.
Churches are a eclectic mix when it comes to prototypes, and this is based on one, but to point it out the exact reference would give the punchline to the layout away. If you somehow can work out exactly where this is meant to be by this representation alone, then shhh!
And later the obligatory 'happy little trees' were added to help give a little more depth. They do need a little tidying up (Especially that flying shrub in the corner!) But for now they're acting as a very nice backdrop to photograph rolling stock against.
Back at the start of March the Micro Railway Cartel released the rules for their annual layout challenge - this time to build a 'tuning fork' layout. As usual for me, I'd used the rules as an exercise to make a few rough layout idea sketches and left it at that.
Then an unexpected flash of inspiration occurred thanks to a very tongue in cheek suggestion for a layout. I'm trying to keep the theme for this one under wraps till entrants are announced later in the year, so apologies if this layout seems to come and go from time to time!
As an added bonus, I've realised there are a few new things I want to try out for possible use on 'Church Lane', so this provides a nice test ground.
To that end, a shelf layout baseboard kit was purchased from Narrow Minded Railworks, ready for a fun project over the Easter weekend:
I've been keen to have a try at one of these since they first released, spurred on a bit by the work of James Hilton showing how a great sense of space can be achieved with the narrow Ikea Mosslanda dimensions in small scales. The kit as seen above comprises of a layout box, fiddlestick, LED lighting strip and the Ikea shelf itself. A larger 75cm length option to fit the Ikea 'Maleras' shelf is also available.
It's interesting that the openings are sized to OO/HO scale standard gauge stock, though besides using the layout as either a run through or single line terminus I can't really see any other options for that size given the 9cm internal depth of the box.
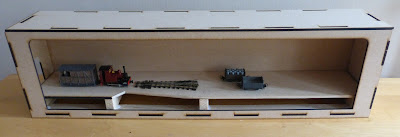
As with a lot of my modelling as of late, I've put a slight twist on the construction. Rather than having the track bed sitting on the box bottom I decided to raise it slightly to allow for some below track scenics. This didn't require much work, the kit includes a flat board with the idea being that you build a layout separate and then finally build the framing round it. A small notch was taken out of this for an eventual scenic feature and then a large slot cut out of the box bottom to allow access for wiring.
Assembled up, this was the result. The trackbed simply sits on some spare scraps of wooden battening and the hole to the fiddle yard in the end of the box has only been partially cut out to match. At this point the lighting lid and the front facia frame haven't been fixed in place to allow for track laying and scenic work.
I'm already having a lot of fun taking photos from a 'just below track level' angle. It helps create a sense of scale that I can't quite get with something like The Garden Railway.
On to day 2 of the baseboard build and the lighting pelmet was tackled. I did have a bit of a panic though when to my eyes the warm white LEDs looked more yellow! A few coats of 'Summer Tide' from a Wilkos tester pot were applied to the backscene and the inside of the pelmet had already been given a very liberal coating of white from a rattle can. The change was immediate and a far more natural tone that I was hoping for.
Another problem though has arose due to the tuning fork plan, with (as seen above) the foreground edge of any items of rolling stock being almost in silhouette. The only thing for it was the bodge the fascia and pelmet to bring the lighting source further forward.
And this was the result, very much inspired by a handy build guide by James Hilton over at his blog. It also proved a good use for some of those spare off cuts I've kept aside just in case!
Even at this very early stage, I'm impressed, and more importantly having a lot of fun thinking of other opportunities for one of these kits...