Monday, 26 May 2025

Control's Train Set

Once again, last week I found myself attending 'The World Championship Railroad Race' at Wembley Park, probably better known under the name Starlight Express.

Unlike last time though, where I was a little overwhelmed by the fact that I was actually there (It'd been a long 23 year wait!) This time there was more of a chance to spot all of the fun details in the set design that I'd missed previously. I'd also smartly remembered to pack the proper camera, which is far superior at taking images in the low level lighting than the phone!

At first glance the overall set looks rather plain, bare, and almost like it was recycled from the movie Tron, but look closer and there's some fun things going on. For those unfamiliar with the plot line the stage set is supposed to be a child's (Only ever referred to as Control) toy train set. There's a few semaphore signals (Interestingly in a 'continental' style) and as can be seen in the top image, many lamp signals along the tracks. 


The highlight for me though was these three toy train props, representing the characters Rusty, Electra and Greaseball. The Rusty prop in particular has a wonderful scene at the start of the show. I can't spoil what happens but all I will say is: It's a really simple piece of special effects work, but it's a great piece of magic. That was the moment during my initial watching when I suddenly felt like I was seven years old again, it's a lovely little sequence.

There's still a very strong urge to pick up an old Graham Farish Jinty and do a repaint, or even one of those old push along N gauge Jintys that they used to give away with Weetabix.


The state of play at the interval. Look a little closer and you'll notice the toy trains have reappeared...

All three models are unpowered, but they do have working lights! Someone more knowledgeable than I will be able to point out what type of diesel locomotive this is. Interestingly, a fun little leftover relic from the original version of the show still survives in the current script, with Greaseball being referred to as a Union Pacific!

Despite being unpowered, all three engines run laps round the stage throughout the interval, with the flat stage having what I can only describe as a 'donut' ring that can rotate 360degrees. The donut middle can also raise and lower during the show.

For a sense of scale here, each of these engines appears to be somewhere in the region of 2ft long. Naturally, it's hard to tell without getting incredibly close to them.

Just thinking about the interval set up again as I'm writing this. Could that be the most obscure theme for a 'pizza' layout?

Monday, 12 May 2025

Narrow Minded Baseboard

"Oh no, not another one"

Yes, afraid so. 

Back at the start of March the Micro Railway Cartel released the rules for their annual layout challenge - this time to build a 'tuning fork' layout. As usual for me, I'd used the rules as an exercise to make a few rough layout idea sketches and left it at that.

Then an unexpected flash of inspiration occurred thanks to a very tongue in cheek suggestion for a layout. I'm trying to keep the theme for this one under wraps till entrants are announced later in the year, so apologies if this layout seems to come and go from time to time! 

As an added bonus, I've realised there are a few new things I want to try out for possible use on 'Church Lane', so this provides a nice test ground.

To that end, a shelf layout baseboard kit was purchased from Narrow Minded Railworks, ready for a fun project over the Easter weekend:

I've been keen to have a try at one of these since they first released, spurred on a bit by the work of James Hilton showing how a great sense of space can be achieved with the narrow Ikea Mosslanda dimensions in small scales. The kit as seen above comprises of a layout box, fiddlestick, LED lighting strip and the Ikea shelf itself. A larger 75cm length option to fit the Ikea 'Maleras' shelf is also available.

It's interesting that the openings are sized to OO/HO scale standard gauge stock, though besides using the layout as either a run through or single line terminus I can't really see any other options for that size given the 9cm internal depth of the box.

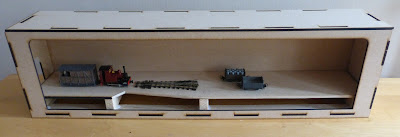
As with a lot of my modelling as of late, I've put a slight twist on the construction. Rather than having the track bed sitting on the box bottom I decided to raise it slightly to allow for some below track scenics. This didn't require much work, the kit includes a flat board with the idea being that you build a layout separate and then finally build the framing round it. A small notch was taken out of this for an eventual scenic feature and then a large slot cut out of the box bottom to allow access for wiring.

Assembled up, this was the result. The trackbed simply sits on some spare scraps of wooden battening and the hole to the fiddle yard in the end of the box has only been partially cut out to match. At this point the lighting lid and the front facia frame haven't been fixed in place to allow for track laying and scenic work.

I'm already having a lot of fun taking photos from a 'just below track level' angle. It helps create a sense of scale that I can't quite get with something like The Garden Railway.

On to day 2 of the baseboard build and the lighting pelmet was tackled. I did have a bit of a panic though when to my eyes the warm white LEDs looked more yellow! A few coats of 'Summer Tide' from a Wilkos tester pot were applied to the backscene and the inside of the pelmet had already been given a very liberal coating of white from a rattle can. The change was immediate and a far more natural tone that I was hoping for.

Another problem though has arose due to the tuning fork plan, with (as seen above) the foreground edge of any items of rolling stock being almost in silhouette. The only thing for it was the bodge the fascia and pelmet to bring the lighting source further forward.

And this was the result, very much inspired by a handy build guide by James Hilton over at his blog. It also proved a good use for some of those spare off cuts I've kept aside just in case!

Even at this very early stage, I'm impressed, and more importantly having a lot of fun thinking of other opportunities for one of these kits...

Monday, 28 April 2025

The Stripper

I seem to be becoming a bit more 'daring' with my modelling this year, trying a few new things that I've always wanted to but lacked the confidence for...


In October last year 'No.1' (A GEM Douglas) had a bit of a mishap and plunged a scale 350ft to the floor, shattering quite impressively but all the parts were recovered. Since then it's been sat in the bottom of an old jam jar, awaiting a date with the Dettol, something I've always meant to have a go at trying.


The results - I wish I'd had a go at this so much sooner! Pleased is an understatement! 

I'l fess up, the thing that put me off the most was the fear of somehow distorting the parts by letting it soak for too long, but this is something I needn't have worried over. Turns out there are some out there who let their models soak for days. I am told it's best to keep a closer eye on plastic kits when soaking though.


More than satisfied, ANOTHER Douglas body was dug out of the box (This one acquired second hand many moons ago) and given the same treatment.

Both disassembled kits soon put to one side with a third new in box Douglas kit. You wait for ages to get round to rebuilding one, suddenly you find yourself building three!

Monday, 14 April 2025

North West Narrow Gauge Show 2025

Last Saturday saw me taking the journey over to Rainhill for my first exhibition attendance of the year. Plenty of layouts, and a nice variety of trade support as well. A very fun couple of hours well spent.

Apologies for the picture quality, such was my rush to there I left the proper camera behind! Likewise, I totally forgot to take a note of every layout I photographed.


This layout was a great example of space saving. The run was a long U shape, but the long straight sections were probably somewhere in the region of 9" wide, only modelling up to the railway boundary.

The above layout caught me a little by surprise, as it appears to have taken heavy inspiration from Chris Ford's 'Garn'. Comparing this quick photo with those online an in Railway Modeller, it might even be the exact same layout with one siding removed and some slightly updated scenics. Unfortunately there was no operator around at the time to ask.

The engine in the middle here really caught my eye. At a glance it appears to have the footplate and side skirts from a Vari-kit, with a body seemingly made from a mixture of Jeanette and Douglas parts. Another potential idea to add to the to do list!

A very pleasing figure eight circuit on Castletown, packing in a lot in a relatively small space.


The South-West Lancs Light Railway (009) is always nice to see.

It also offered a chance at seeing Charles Insley's recently repainted Kato George England, now in the light blue livery.

Post-exhibition time saw a visit to a relative's to 'play trains' on their 009 layout for a few hours. It was also a good opportunity to get to grips with a show purchase: A Narrow Planet Bagnall side tank. I'd been after one of these for a while before they were discontinued, so to find one at a more than reasonable price on the 009 sales stand was a real treat! Needs a bit of fettling in forwards to prevent a slight swagger, but in reverse it glides like a sewing machine. Very happy.

Big thanks to the shows organisers for putting on a great day.

Monday, 31 March 2025

MK2 Station Building

Before setting out to build Church Lane almost all of the structures were complete. The one exception to the rule was the Chris Ford inspired station building.

The one I'd originally built wouldn't quite work for the layout, the entrance being on the (viewers) right hand side whereas here a left handed entrance works better visually with the 'lane' suggested beyond the buffer stop. 


Purely by chance, even though I'd planned to have another go at this particular kitbash again, everything worked out in a way that sort of pushed me into building it. A Will's tin chapel kit was picked up cheaply second hand (Complete, but marked as 'broken' - This turned out to be a simple crack in one of the side pieces), a set of Peco doors and windows was also found at the same time, most importantly though a copy of C.C.Green's 'Vale of Rheidol' book was picked up at Railex Taunton last year featuring some fantastic profile shots of the station building at Devil's Bridge during the 1950s as a reference.


A couple of quick snaps before painting shows how all the parts immediately alter the look of the building. 

For a more in depth how to, consult the book.


Side by side, it's quite nice to see a comparison of how my modelling has improved!


A coat of primer helps tie everything together nicely.


And finally, sat at the end of the line with the matching goods store and signal box in the distance. Even without ground scatters and scenics, it's already starting to look really nice.

I know I'd mentioned previously about wanting to attempt a 'Cameo' style box presentation for this layout, but just looking at the above view has me thinking otherwise. I really like it, but I have to remember that both the walling and station building will be sitting a little higher when groundwork is finished.